Documentation
Meet and Talk - Dialogue System

- Version: 1.6.0a
- Author: Tiny Slime Studio
- Created: 01 March, 2023
- Update: 29 May, 2024
- File Size: ~20 MB
- Unity Versions: 2021.3.17+
Getting Started
Create a new 3D project.

From the toolbar, select
Window -> Package Manager to open the Package Manager

From Droplist Packages: select
My Assets and search Meet and Talk, download and install

Once installed, the assets are ready to be installed
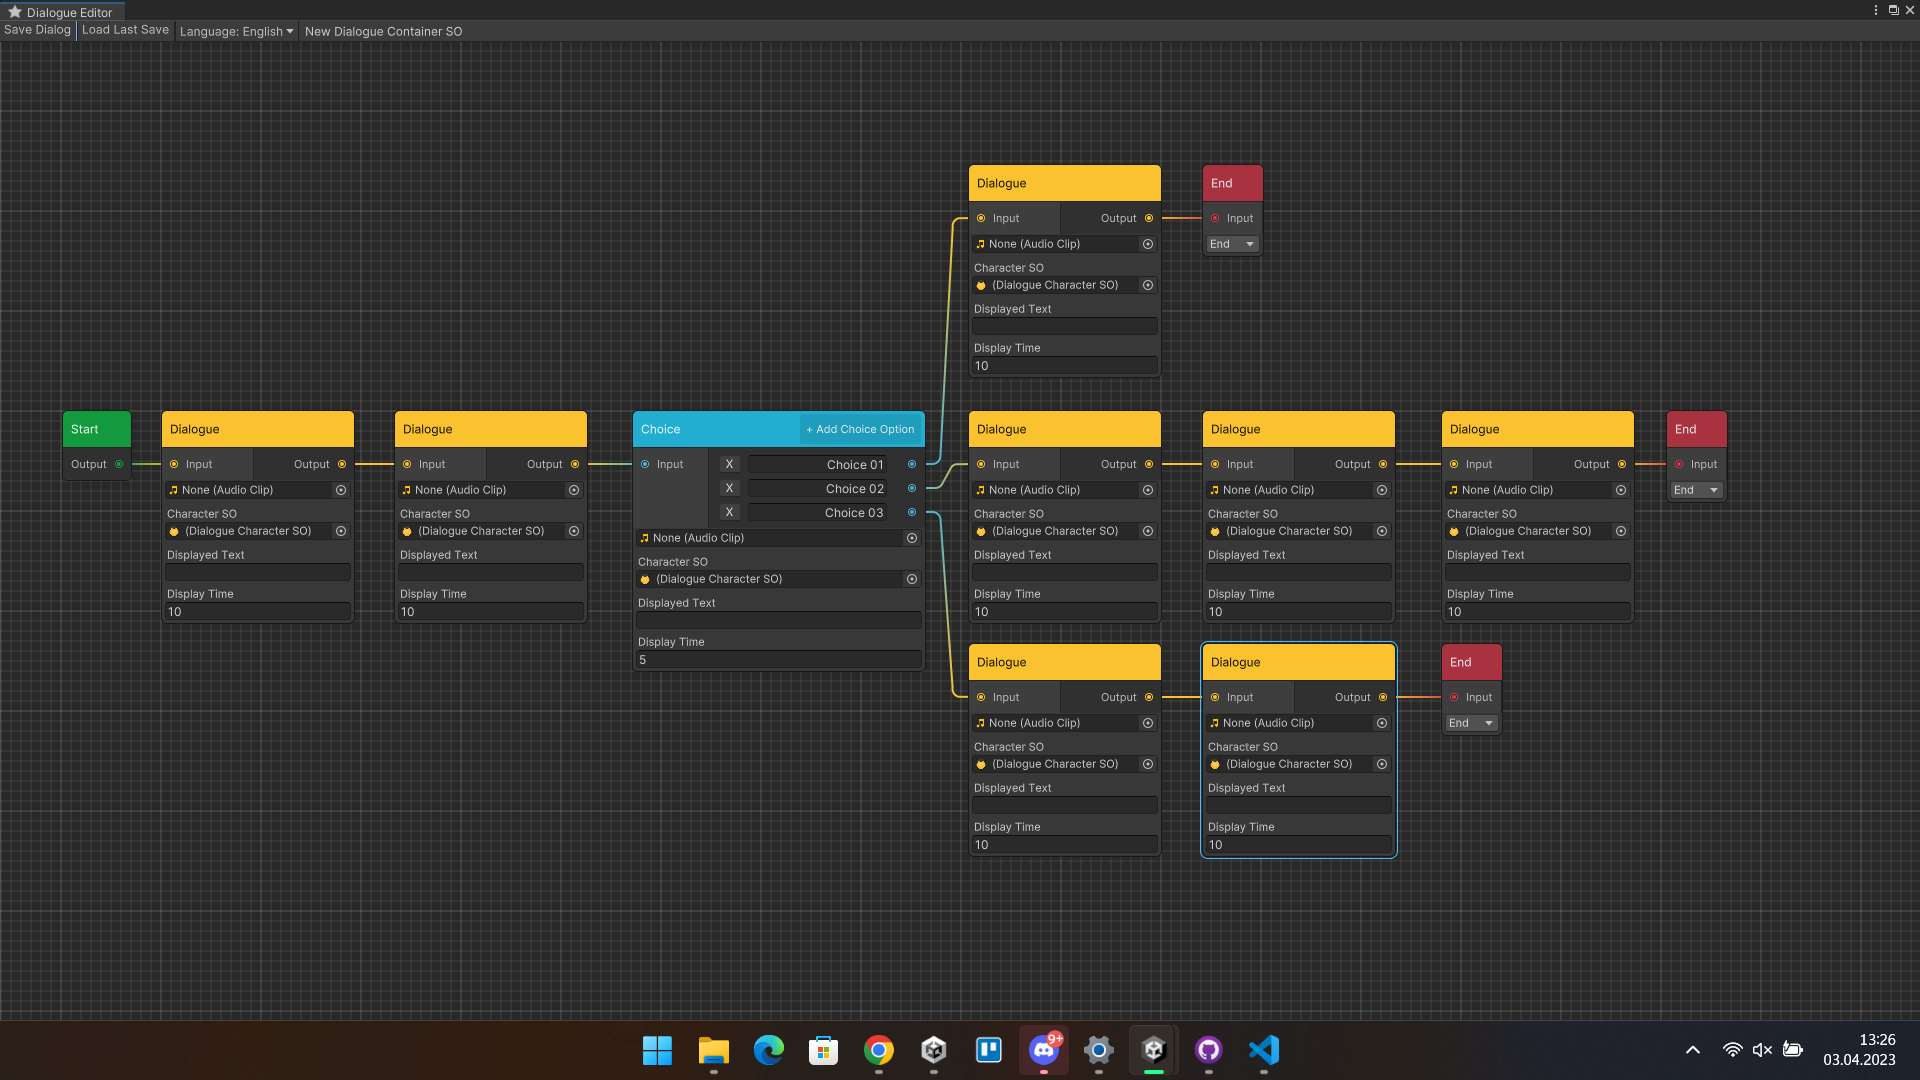
Node


Start Node
The Start Node is used to initiate a dialogue. If you want the dialogue to begin from one of several predefined points, add multiple Start Nodes. You can also assign a Start Node ID, which allows you to invoke a specific beginning of the dialogue without the need to create multiple copies of the same dialogue.
Dialogue Node
The Dialogue Node is a fundamental node for displaying text. It allows assigning the speaker for the current line, associating an audio clip, and setting display time.
- Audio Clip Audio played when the node begins.
- Character SO Name of the character delivering the dialogue.
- Avatar Position Character Avatar Position, Left, Right, or No Avatar Display
- Avatar Emotion One of the available Character Emotion options
- Displayed Text Text displayed when the node begins.
-
Display Time
Time after which it automatically transitions to the next node.
[if 0, manual transition is required]
Choice Node
The Choice Node functions similarly to the Dialogue Node, but the player must select one of the available responses.
- Audio Clip Audio played when the node begins.
- Character SO Name of the character delivering the dialogue.
- Avatar Position Character Avatar Position, Left, Right, or No Avatar Display
- Avatar Emotion One of the available Character Emotion options
- Displayed Text Text displayed when the node begins.
- Time to Display Option Time after which the options will be displayed.
To add options, click + Add Choice Option in the top right corner of the Node.
End Node
The End Node is used to conclude a dialogue, but it has several additional options
- End Ends the Dialogue
- Repeat Repeats the last displayed Node
- GoBack Repeats the second-to-last displayed Node
- ReturnToStart Returns to a random Start Node
Pro Timer Choice Node
The Timer Choice Node works similarly to the Choice Node, but if the player does not select a response within a specified time, the system will automatically proceed to the assigned node
- Audio Clip Audio played at the start of the node
- Character SO Name of the character delivering the dialogue
- Avatar Position Character Avatar Position, Left, Right, or No Avatar Display
- Avatar Emotion One of the available Character Emotion options
- Displayed Text Text displayed at the start of the node
- Time to Display Option Time after which the options will be displayed
- Time to Make Decision Time player has to make a decision
To add choices, you need to click + Add Choice Option in the top right corner of the Node
The first added port corresponds to the transition if the player does not select any option
Pro Event Node
The Event Node does not display any information for the player but is used to execute assigned events.
To add a new Event, you need to click the + Add Event option in the top corner of the Node and assign a previously created event to it or automatically create an event from the Node's position.
Pro Random Node
The Random Node has a simple task; when executed, it randomly selects a different Node.
To add a Random dialog, you need to click the + Add Option option in the upper right corner of the node and assign the next Node to it.
Pro IF Node
If Node checks whether the selected value with the given requirements returns true or false.
Pro Command Node
The Command Node is used for creating comments in the editor. It can help in organizing large dialogs and make it easier to identify which part of the dialog it is.
New Dialogue
In the Hierarchy tab, right-click, in the pop-up window hover over the Create option, hover over the Dialog option and click New Dialogue
Double-click on the created dialogue to edit it
You will open the dialog editing window, at the beginning you must add start Node, and at the end of the dialog you must give end node
You can have more than one end of the dialog and at each end you must give end node
At the End you have to write the changes in the Dialog in the upper left corner of the editor
Create New Character
In the Hierarchy Tab, right-click, and in the pop-up window click Create -> Dialogue -> New Dialogue Character
In the Inspector tab, you will see all the options available for the character
- Character Name Here you set the name in each available language
- Text Color Here you set the color that the character's name should have
Setup Dialogue UI
To set up the Dialogue UI, you need to drag the Meet and Talk Prefab from the Assets -> Meet and Talk -> Example folder into the scene where you want to use the Dialogue System
The Prefab can also be dragged, for example, into a player prefab, allowing for faster usage across multiple scripts
The Meet and Talk.prefab contains two main objects responsible for the system's functionality
Dialogue Manager
Dialogue Manager contains all the scripts responsible for executing dialogues
Dialogue Event Manager.cs
Handles the execution of Event Nodes
Appropriate code can be added to it to expand the functionality of Events; in the future, there will be several examples of expanding this script
Dialogue UI Manager.cs
Handles the management of the UI displayed during dialogue
- Enable Type Writing Enables Type Writing Animation
- Typing Speed Typing Speed for Type Writing Animation (X/sec)
- Dialogue Canvas Main UI Object
- Text Box Text box where dialogue text is displayed
- Timer Slider Slider indicating the choice time
- Button Prefab Button Prefab used for choices
- Button Container Object where buttons appear
Dialogue Manager.cs
Dialogue Manager is responsible for processing the Dialogue File
By referring to this script, you can change the dialogue and also initiate dialogue
- Localization Manager Scriptable Object containing language settings
- Audio Source Audio Source from which sound will be played
- Start Dialogue() Unity Event executed when starting the Dialogue
- End Dialogue() Unity Event executed when ending the Dialogue
Dialogue UI
Dialogue UI Object is the UI displayed during dialogue; you can customize it as needed or duplicate the object in the prefab, customize it, and assign it to the DialogueUIManager.cs script contained in the same
prefab
Using Dialogue in the Game
To set up Dialogue for a scene, you need to go through a few steps:
1. Setup UI
You need to prepare the Dialogue UI as described in this part of the documentation [Setup Dialogue UI]
2. Interaction Object
To use the dialogue, you must have a prepared object in the scene that can trigger the dialogue. For the purposes of the demo and documentation, I will describe an example using TriggerArea.cs, but it could be a different
script allowing the use of Unity Events, for example, InteractionScript.cs in Hellish Battle - 2.5D Retro FPS
3. Setting Up Unity Events
Now we move on to the actual usage of the dialogue. You can trigger the dialogue in two different ways
Dialogue First, Execution Next
In this approach, we need to add 2 new elements to the UnityEvents
1. DialogueManager.SetupDialogue(DialogueContainerSO) to which we assign the dialogue we want to execute
2. DialogueManager.StartDialogue
Here, we have two options: either we choose StartDialogue(), which will begin the dialogue from a random Start Node, or StartDialogue(string), which will
try to find a Start Node with the ID assigned during the script execution. If it doesn't find one, it starts the dialogue from a random Start Node
StartDialogue(string) is only available in the Pro Version
Direct Execution of Dialogue
In this approach, we need to add a new element to the UnityEvents: DialogueManager.StartDialogue(DialogueContainerSO), which assigns and immediately executes the dialogue from a random Start Node
Direct Execution of Dialogue does not support starting the dialogue from a Start Node with a specific ID
Global Value
To open Global Value, go to Edit -> Project Settings and then find the tab
Meet and Talk -> Global Value Manager
There will be 4 tabs Int, Float, Bool and String in these tabs you can add and edit variables
- Name We refer to a specific variable
- Value The current value of the variable saved with PlayerPrefs
- Default Value Value set during Reset/Create Variable
Pro New Event
If you want to create a new event You need to create a new event script, where you write your event code
using System.Collections;
using System.Collections.Generic;
using UnityEngine;
[CreateAssetMenu (menuName = "Dialogue/Event/YOUR_NAME" )]
[System .Serializable ]
public class YOUR_NAME_Event : DialogueEventSO
{
public override void RunEvent()
{
// Your Code Here
}
}
In the Hierarchy tab, right-click, in the pop-up window hover over the Create option, hover over the Dialog option, hover over the Event option and click YOUR_NAME
Now you can edit Event values directly in the Editor, after assigning an EventSO below you will see a list of all the supported values you can edit
Supported Values Type:
Int Float String Bool Enum Color Gradient Object Animation Curve Vector 2 Vector 2 Int Vector 3 Vector 3 Int Vector 4
Pro New Character Emotion
In Character SO, you can assign avatars that you can display during dialogue. To add new emotions, you need to open
DialogueCharacterSO.cs. At the very bottom of the script, there's an enum named AvatarType. Here, you can add new emotions.
Remember to assign them an ID, which must be the next number after the last variable.
After saving, new fields with the added emotions will be automatically added to the created CharacterSO.
Remember to add left and right sprites for each of the available emotions.
Pro Use Global Value in Dialogue
To use Global Value in Dialog, you need to write {VARIABLE} in Dialogue, Choice or Timer Choice Node, so that when you fire up Dialog, the desired variable is displayed
For the moment, Dialogue can display Int, Float, Bool and String.
For Int and Float variables, we can write {VARIABLE, Value}, which will display the number that remains after changing the Variable by a given value, or how much the Variable is missing to reach the Value
Pro Import / Export Text
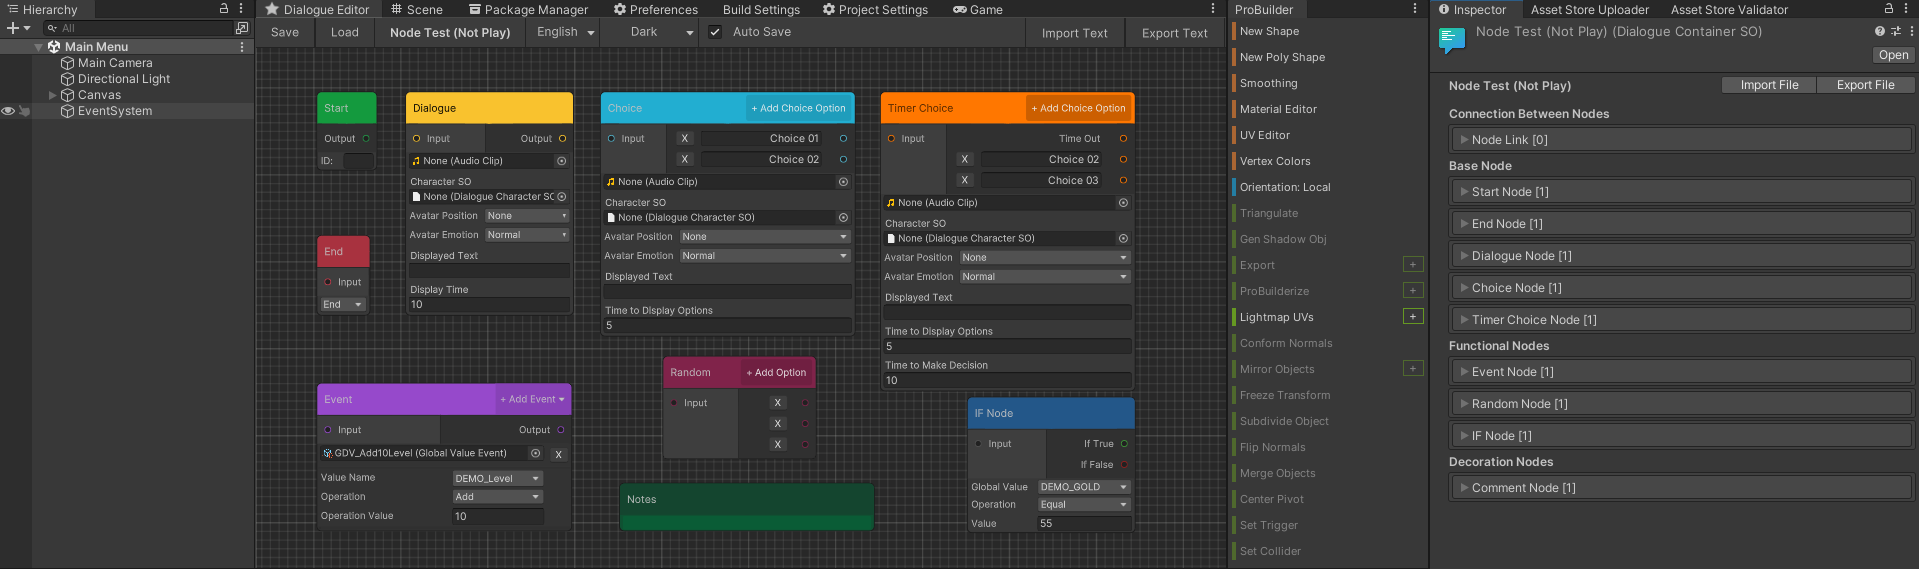
The data is saved to a .tsv file that can be easily opened in, for example, Excel, Word, etc.
From update 1.5.0a there is an option to export and import localization of dialogues. the option is available in Dialogue Editor and in Inspector
Hellish Battle Integration

Hellish Battle - 2.5D Retro FPS supports Freeand Pro Version
The only thing you need to do to integrate Meet and Talk and Hellish Battle, you need to install Meet and Talk in the Project where Hellish Battle is located

Setup Dialog
To Add Dialogue to your scene, you must, in the InteractionScript.cs in the WhenInteraction() field, add the appropriate script call which is described here
[Use Dialogue in Game]
Ultimate Horror FPS Kit

Ultimate Horror FPS Kit supports Freeand Pro Version
The integration with Ultimate Horror FPS Kit has been made possible thanks to the generosity of ThunderWire, who provided instructions for integrating their asset with mine.
To access the integration instructions for UHFPS with Meet and Talk, please refer to the UHFPS documentation (link below) to go through all the steps:
[Ultimate Horror FPS Documentation]
[Ultimate Horror FPS Asset Store]
More Templates


Changelog
See what has been added, changed in updates.
Do you want to check what will be in the next update? check it out for the always up-to-date roadmap: Trello
Version 1.6.0a 29 May, 2024
- Added Pro End Option: Start New Dialogue
- Update Pro Improved Event SO
- Added Free Dialogue Editor Validation
- Added Free Migrate to MeetAndTalk namespace
- Update Free Improved Hellish Battle Integration
Version 1.5.0a 03 April, 2024
- Added Pro Import / Export Text
- Added Free 3 New UI Demo
- Added Free Updated Dialogue Manager UI
- Added Free Locking Option to Open Editor in Play Mode
Version 1.4.0b 02 February, 2024
- Updated Pro Change Font to Cube Cavern
Version 1.4.0a 26 January, 2024
- Added Pro If Node
- Added Pro Global Value Event
- Added Pro Global Value in Dialogue
- Added Pro Hide Private Value in Event Node
- Added Free Global Value (Int, Float, Bool, String)
- Added Free Global Value UI
Version 1.3.0a 02 September, 2023
- Added Pro Character Avatar
- Added Pro Avatar Emotions
- Added Pro Type Writing Support Rich Text
- Added Free Auto Save Dialogue
- Added Free Hide Skip Button on Choice
- Fix Fix Link Break Error
Version 1.2.0a 25 August, 2023
- Added Pro Command Node
- Added Pro Random Node
- Added Pro Start ID
- Added Pro Typing Animation
- Added Free Click Button to next Dialog
- Added Free Better Naming
Version 1.1.0a 25 May, 2023
- Added Pro Better Event Node
- Added Free Random Start Node
- Added Free Selectable Editor Theme
- Added Free Possibility of not using the character's name with dialogues
- Added Free Add New Font DigitalDisco.ttf
- Fix Fix Warning when dialog didn't have audio
Version 1.0.0b 07 April, 2023
- Integration Free Hellish Battle Integration
- Added Free Skil Button
- Fix Free Fix Few Bugs
Version 1.0.0a 01 March, 2023
- Added Free Dialogue Window
- Added Free Start Node
- Added Free End Node
- Added Free Dialogue Node
- Added Free Choice Node
- Added Free Character SO
- Added Free Localization
- Added Free Audio
- Added Pro Timer Choice Node
- Added Pro Event Node
- Added Pro Dialogue SO Custom Editor